on
Weather Like it's 1999
Contents
Overview
I’ve put together a system that allows me to use an old (1980s) CRT TV to display a 1990s version of The Weather Channel for my location. I have some plans to add additional channels consisting of my front door camera, home videos, etc.
Background
Almost a year ago, my wife went on a trip out of town to visit her sister. When this happens, I usually look around for small projects to do to fill the time between when my kids go to bed and I fall asleep. That weekend, I stumbled upon older Weather Channel emulators and I wanted to get one running for myself.
The “standard” in this space seems to be this project, however it has not received updates in a while and is not open source. Some more searching led me to a web-based emulator project called Weatherstar 4000+. I contributed a Docker build to the project and got it up and running on my home infrastructure. This project emulates the 1990s Weatherstar system used by the Weather Channel. I also found another project the emulates the Intellistar system that was used between 2003 and 2015, but I’m not currently using it.
At the time, I thought “Man, it would be so cool to get this running on an old CRT” but I didn’t have a CRT laying around and I moved on to other things. About a month ago, my brother asked if I still had my Weather Channel running. I told him I did and that I had wanted to get it running on a CRT. He said I had to do it, so I dove back into this project.
The Hardware
If you want to do something like this, you’ll need a few things:
- A CRT
- Some source to display on it
- A way to get the much more modern source connected to the much older TV
I wanted to put my CRT on the bookshelf behind my desk so that it could be visible on video calls. This limited the depth to about 12 inches. I had forgotten just how thick these CRTs were. This placed a limit of 8-9 inches on the screen size. The Sony PVRs were also too deep, so those were out. I liked the look of the late 80s Zenith F0920A model, so I found one on eBay. This model is old enough it only supports RF input and I wanted to use a Raspberry Pi, so I’d need a way to get this video down to RF. As we talk about video here, remember that all this analog stuff is 480i. I chose to use a Raspberry Pi 4, as there are pretty well documented ways to get composite video out of it. The 5 seems to require soldering to get composite out. There are RF modulators that take composite video and audio and modulate that to RF over coax cable, which would be perfect. There are even models available cheaply that can handle multiple channels! I found a Channel Plus 5445 modulator on Facebook Marketplace for $40 shipped. This model supports 4 different video input sources and lets you program the channel number for each of the 4 channels. That brings my list of required hardware up to:
- 1989 Zenith F0920A TV
- Raspberry Pi 4 (microSD card, power supply, case)
- Composite video cable for Raspberry Pi
- Channel Plus 5445 RF Modulator
- Coax cable
The Content
If you want to build an in-home cable TV network, you’ll need some content. I’m hosting all of this myself, but you could easily integrate Internet content sources instead. I obviously have my Weather Channel, but with 3 other channels on my RF modulator, I could stand to have some more! But let’s start with weather.
I needed a way to get the Weather Channel music added on top of the video, which the Weatherstar 4000+ project doesn’t support. Luckily, the fine folks at the Internet Archive have a collection of the tracks. I used VLC for a while to shuffle through these tracks, but it doesn’t reshuffle on every run through the list, so the playout gets predicable. Additionally, I wanted finer grained control over what plays, like Christmas music during December or Star Wars on May 4th. I found the AzuraCast project which lets you build out an Internet radio station that supports this sort of scheduling. It outputs audio via Icecast so VLC, OBS, or nearly anything else can stream it. You can even load up the station from a web browser to play it. It took a bit of work to get their Docker container running in Kubernetes, but it was well worth it for the rich featureset.
There are different ways to integrate the audio and video I’m sure, but I went with running OBS on a Mac Mini I have.
2024-08-15 Update:
I didn’t love running OBS all the time on the Mac Mini, so I built a Docker container that can stream the webpage over RTMP.
I’m able to bring in Weatherstar via a Browser Source and Azuracast via a Media Source. I’m streaming this from OBS to another service called Restreamer. This results in an HLS stream that a remote VLC player (the Pi) can stream from. Weather solved! What else can we do?
A couple years ago, my dad digitized all of our old family home videos from VHS. I’ve got the mp4 files for all of them sitting on my NAS. What if I could build a custom channel that played random home videos all the time? It turns out there is a project called ErsatzTV that is designed to do this sort of thing. It lets you create custom channels with your own content (from storage, Plex, or Jellyfin), build schedules, add logo watermarks, even add filler such as commercials between content and at chapter markers. I don’t need all of that, but I did build a quick channel that shuffles through my home videos endlessly and created a logo to put in the bottom right corner of the screen. You could easily use this to create your own streaming movie channel, having it play a Star Wars marathon on May the 4th, only Christmas movies during the month of December, and a Harry Potter marathon every night during a week of November. You could recreate Adult Swim, Nick at Nite, or the Discovery Channel from whatever time period you want, even going so far as adding period-correct ads (remember Floam?). So we’ve got some content, how do we get our hardware to play it?
The Player
I had quite a bit of trouble getting the Raspberry Pi to play video over the composite out. I tried with and without a desktop environment, using different software to play the content, and even older versions of the OS. It seems like the newer desktop environments don’t support composite out super well, and I couldn’t get them to come up without a keyboard plugged in. Since I intend to run this Pi completely headless, I have no desire to have a keyboard plugged in or even to have a desktop environment. In the end, I got a pretty good solution in place, but if you’re wanting to follow along, you’ll want to have some familiarly with the Linux command line. This isn’t intended to be a full tutorial, but hopefully it provides some guidance. I used Raspberry Pi OS Lite (bookworm).
Composite Out
From here on out, this assumes you’re using composite out for the video. If you’re not doing that, skip this section, and everything should still work fine over HDMI. This works on my Raspberry Pi 4, your milage may very with other hardware versions.
Edit the /boot/firmware/config.txt file and make sure the following lines look like this:
# Enable DRM VC4 V3D driver
dtoverlay=vc4-kms-v3d,composite
max_framebuffers=2
overscan_scale=1
VLC
The only way I’ve got this to work is by splitting it into two parts: a script, and a systemd service that calls it. I never got it working when I tried to do everything in the systemd unit file.
Create a script wherever you want (I did my home directory), and put in your stream URL: /home/mitchell/start-vlc.sh
#!/bin/bash
# This sleep seems to be necessary to give the system time for networking to come up, even with the systemd unit file specifying multi-user.target...
sleep 10
# Disable video title, crop to 4:3, disable file caching. Could also use --aspect-ratio=4:3 to squish instead of crop if that fits your content better
cvlc --no-video-title --crop=4:3 --file-caching 0 "https://weather.example.com/stream.m3u8"
2024-05-16 Update:
Updating Restreamer past version 2.8.0 seems to have broken how VLC was playing the HLS stream when called from systemd. Running it interactively was fine. I assume this is due to Restreamer switching to ffmpeg v6.
I tried using ffmpeg piped to mplayer to get around this issue:
ffmpeg -i "https://weather.example.com/stream.m3u8" -vf "crop=640:480,scale=640:480" -c:v libx264 -crf 18 -preset veryfast -f avi - | mplayer -vo fbdev2:/dev/fb0 -
That worked, but it seemed to cause the Pi to run about 5° C warmer. Apparently VLC was happy to play the RTMP stream from Restreamer via systemd, so I just swapped to that:
cvlc -v --play-and-exit --no-video-title --crop=4:3 --file-caching 0 "rtmp://weather.example.com/123e4567-e89b-12d3-a456-426614174000.stream?token=Sup3rS3cr3t"
#bless it to execute with chmod +x start-vlc.sh
Create a systemd unit file /etc/systemd/system/vlc-stream.service, swap in your full path and your own username:
[Unit]
Description=VLC media player

[Service]
ExecStart=/usr/bin/bash -lc /home/mitchell/start-vlc.sh
Restart=always
User=mitchell

[Install]
WantedBy=multi-user.target
Reload systemd, enable the service (this makes it run on boot), and start it if you want to test it:
sudo systemctl daemon-reload
sudo systemctl enable vlc-stream
sudo systemctl start vlc-stream
If there are issues, you can check the logs with sudo systemctl status vlc-service
You can check temperatures with vcgencmd measure_temp, but even with no cooler at all, my Pi ran under 50° C while outputting video for hours. If you have Home Assistant and MQTT running, you might consider this project so that you can add the Pi’s CPU temperature to your Home Assistant dashboard.
Putting it All Together
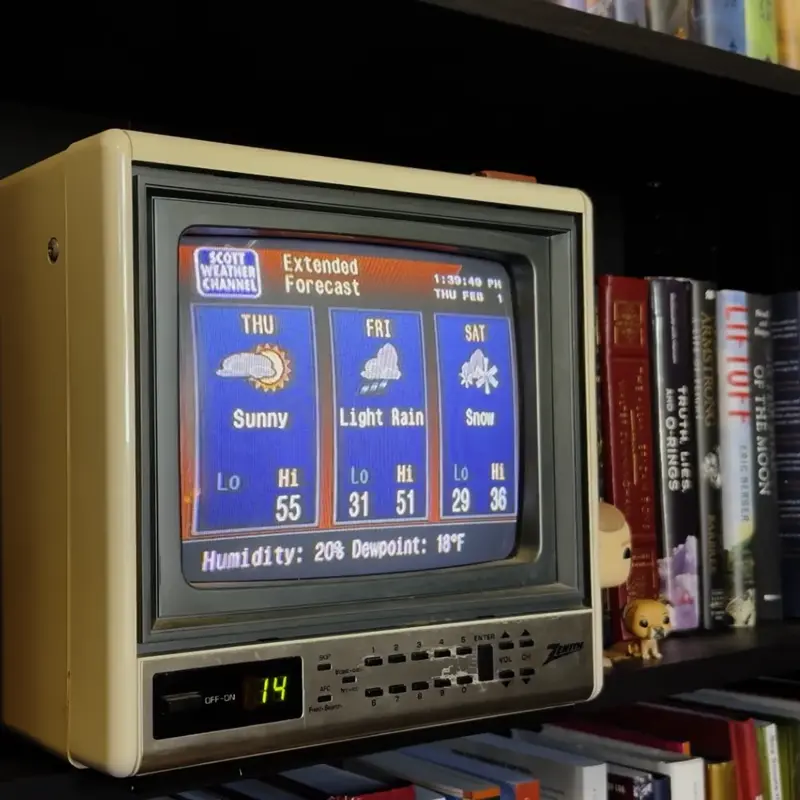
Plug in all the cables, choose the channel you want to use on your RF modulator, then power everything up! Tune your TV to the correct channel, and enjoy your content! My Zenith TV starts up on channel 2 by default. I wanted to put it on a smart switch so I could toggle it from my computer for meetings and to make sure I didn’t run the CRT too long, as some of the static content in my weather stream is probably prone to burn-in. I haven’t located a manual for my TV online, but after some experimentation I found that for these Zenith TVs you can press the SKIP button while on a channel to skip over it during both power up and the channel up/down navigation. You can still manually enter the channel, which is also how you can un-SKIP it. Now, when I trigger my smart plug via Home Assistant, the TV powers up and starts on channel 14, which is my very own 1990s Weather Channel!
I created a diagram to show all of the pieces in play here:

Potential future expansions of this project include the additional channels I mentioned earlier (with 1 additional Pi per channel) and it would also be cool to pair an RF amplifier like this with a set of rabbit ear antennas to create a low power over the air transmission, broadcasting to multiple TVs. Signing off for now!
